How to Create and Use Custom Avatars in Bonelab

In this tutorial we will show you how to create and use custom avatars in Bonelab. On the off chance that you’re looking to make your Bonelab experience as custom-customized as could expected, you’ll have the option to import your own custom symbol into the game. Presently, you’ll possibly have the option to do this on the off chance that you’re on PC right now, as you’ll require a couple of tools to get this innovative blast going. However, you’ll likewise have the option to pull off 360 Headshots with Hatsune Miku on your Oculus Mission 2, as long as another person created it first.

In this tutorial we will show you how to create and use custom avatars in Bonelab. On the off chance that you're looking to make your Bonelab experience as custom-customized as could expected, you'll have the option to import your own custom symbol into the game. Presently, you'll possibly have the option to do this on the off chance that you're on PC right now, as you'll require a couple of tools to get this innovative blast going. However, you'll likewise have the option to pull off 360 Headshots with Hatsune Miku on your Oculus Mission 2, as long as another person created it first. How to Create and Use Custom Avatars in Bonelab To create your own custom avatars, you'll initially have to download Solidarity, the game improvement engine, and set up Github, a hosting administration that designers and modders use to share and team up on projects. From here, you should download a particular tool called the MarrowSDK, which is the tool you'll have to create the symbol. There are many advances involved from here, yet fortunately there is a top to bottom tutorial that can direct you through the full course of how to use the tool, import, and create your avatars, as well as spawnables and levels if and when you need to take your innovativeness a piece further. Also read:  How to Get a Custom Matchmaking Key in Fortnite How to Import and Use Custom Avatars To use your custom avatars, you'll have to add them to your mods organizer. Another person to modding may find this intimidating, yet you'll see that the most common way of installing mods is a seriously simple cycle once you know what to do. Set forth plainly, you'll need to find your mods organizer in the game directory, which depending on your framework will tracked down better places. Their areas are as per the following: For PC: AppData/Locallow/Feeling of anxiety Zero/Bonelab/Mods For Journey 2: Android/information/com.StressLevelZero.BONELAB/records/Mods You'll then, at that point, drop your .sdk record into this organizer, and the following time you load up, you ought to find your custom symbol in the Mod Hub, prepared to download. Finally, make a beeline for the Body Shopping center in-game and you ought to find your custom symbol prepared to use.

How to Create and Use Custom Avatars in Bonelab

To create your own custom avatars, you’ll initially have to download Solidarity, the game improvement engine, and set up Github, a hosting administration that designers and modders use to share and team up on projects. From here, you should download a particular tool called the MarrowSDK, which is the tool you’ll have to create the symbol. There are many advances involved from here, yet fortunately there is a top to bottom tutorial that can direct you through the full course of how to use the tool, import, and create your avatars, as well as spawnables and levels if and when you need to take your innovativeness a piece further.

How to Import and Use Custom Avatars

To use your custom avatars, you’ll have to add them to your mods organizer. Another person to modding may find this intimidating, yet you’ll see that the most common way of installing mods is a seriously simple cycle once you know what to do. Set forth plainly, you’ll need to find your mods organizer in the game directory, which depending on your framework will tracked down better places. Their areas are as per the following:

  • For PC: AppData/Locallow/Feeling of anxiety Zero/Bonelab/Mods
  • For Journey 2: Android/information/com.StressLevelZero.BONELAB/records/Mods

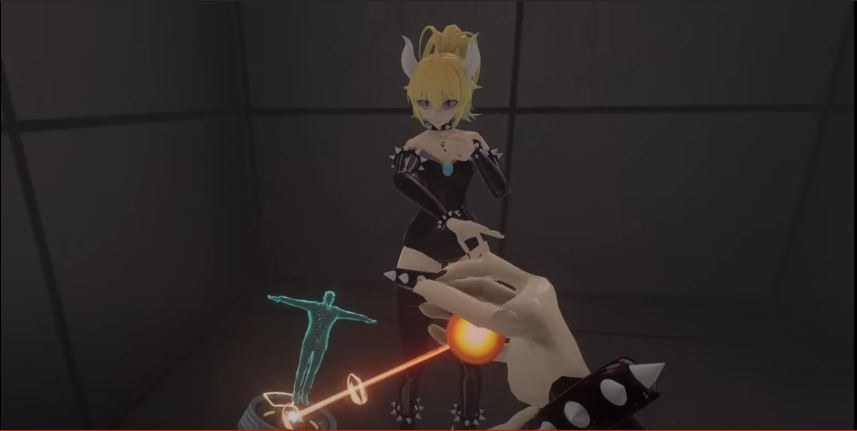
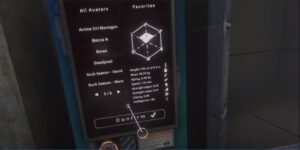
You’ll then, at that point, drop your .sdk record into this organizer, and the following time you load up, you ought to find your custom symbol in the Mod Hub, prepared to download. Finally, make a beeline for the Body Shopping center in-game and you ought to find your custom symbol prepared to use.

In this tutorial we will show you how to create and use custom avatars in Bonelab. On the off chance that you're looking to make your Bonelab experience as custom-customized as could expected, you'll have the option to import your own custom symbol into the game. Presently, you'll possibly have the option to do this on the off chance that you're on PC right now, as you'll require a couple of tools to get this innovative blast going. However, you'll likewise have the option to pull off 360 Headshots with Hatsune Miku on your Oculus Mission 2, as long as another person created it first. How to Create and Use Custom Avatars in Bonelab To create your own custom avatars, you'll initially have to download Solidarity, the game improvement engine, and set up Github, a hosting administration that designers and modders use to share and team up on projects. From here, you should download a particular tool called the MarrowSDK, which is the tool you'll have to create the symbol. There are many advances involved from here, yet fortunately there is a top to bottom tutorial that can direct you through the full course of how to use the tool, import, and create your avatars, as well as spawnables and levels if and when you need to take your innovativeness a piece further. Also read:  How to Get a Custom Matchmaking Key in Fortnite How to Import and Use Custom Avatars To use your custom avatars, you'll have to add them to your mods organizer. Another person to modding may find this intimidating, yet you'll see that the most common way of installing mods is a seriously simple cycle once you know what to do. Set forth plainly, you'll need to find your mods organizer in the game directory, which depending on your framework will tracked down better places. Their areas are as per the following: For PC: AppData/Locallow/Feeling of anxiety Zero/Bonelab/Mods For Journey 2: Android/information/com.StressLevelZero.BONELAB/records/Mods You'll then, at that point, drop your .sdk record into this organizer, and the following time you load up, you ought to find your custom symbol in the Mod Hub, prepared to download. Finally, make a beeline for the Body Shopping center in-game and you ought to find your custom symbol prepared to use.